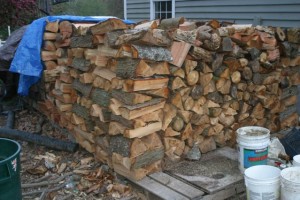
“Nathan, you make a good looking woodpile.”
You’ve got to smile when your mother-in-law compliments your collection of firewood. It happens that mine actually splits and stacks her own firewood, and knows what she’s talking about.
Over the past several years I’ve had about a dozen different people help out with moving, hauling and stacking firewood with me. I love having willing volunteers, and it’s been great to have the help—especially with tasks that take more muscle than brain. What has surprised me though, is only 1 of my helpers has known how to stack a proper woodpile.
Often the pile starts out in the gap between two conveniently located trees, and is soon followed with a question like: “What should we do now–there isn’t any space left to put away the rest of the wood?” Or maybe the opportunity would show up as the helpers began a second row of wood which rapidly turned into a triangle with pieces rolling down the face of the new row. Last December, I had a person ask me, “why are you putting the pieces on the end of the pile the wrong direction—does that help with the air-flow?”. I’m always glad when these questions come up and I can to show how this keeps the logs from rolling off the end of the pile—it’s easiest to explain the pile is going up.
I’ve toyed with the idea of offering educational workshops on the farm–including a course on firewood stacking. I could have a big load of wood dumped next to the house, and get everyone to do the work for me as I explained the details of making a stack that has square, vertical ends with a lovely, flush face and level top. If there was time we could discuss the finer points of how the pieces used on the perpendicular ends must always be of split rounds of equal depth & height, and that there should be an ever so slight slope towards the center of the pile to prevent the wood from falling over the wrong way as it dries. It would be important to have actual firewood to work with since wordy descriptions just don’t work as well.
For those ambitious learners we could even go into the science of splitting and “reading” wood for checks and knots. There would be discussion sessions to compare effort & heating performance of Douglas fir vs. alder or maple. The second course would pick up and go through the details of felling, limbing and cutting with axes, hand powered crosscut saws and 2-cycle chain saws.
This would also tie together with what time of year is good for using the small branches & leaves for goat browse, as well as how mushrooms & fungus feeding on the stumps & roots of harvested trees enriches the soil for the new seedling trees.
It would take at least a full afternoon to cover the many topics of woodlot management, and how coppiced trees produce firewood & poles so much more efficiently than wild timber stands. It would be good if I had demonstration areas of pollard trees and living fence posts which facilitate animal grazing operations. There would have to be an additional day to discuss species and site selections so people could decide whether to plant a colonizing, leguminous trees like red alder and black locust, or whether a climax species like western red cedar or Oregon maple would be most appropriate for their woodlots & pasture hedgerows.
The class applications could culminate with kindling fires in a cast iron wood stove to cook a meal, a masonry oven to bake the bread, and a Finnish-style masonry heater to warm the building for the day.
….
My, but how daydreams can roll on while doing a mindless task like stacking firewood….

