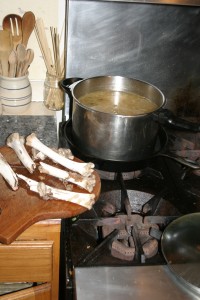
We’ve been working through the GAPS diet very thoroughly this spring, and a central part of that has been preparing lots and lots of high quality broth. Preparation is easy, but it does take a few days to finish.
Here’s the routine I follow. It’s basically straight out of Nourishing Traditions by Sally Fallon:
I’ve got a 10 quart stock pot that I like to use, and I start out with a couple pounds of bones in the pot. Since we buy our beef direct from the farmer, the bones come from with the meat from the butcher. After filling with cold water, I add about 1 Tablespoon sea salt, and 1/3 cup apple cider vinegar and bring it to a boil, uncovered. As it starts to bubble, I skim off all the foam as it collects on the surface. This will remove a lot of the impurities from the broth.
I’ve noticed that meat that has been through the koshering process (soaked & salted) has much less foam to skim on the first step—which is interesting isn’t it?
After skimming, I reduce the heat to a low simmer and cover the pot. At this point I’ll add any seasonings I feel like at the time; black pepper, mustard seed, onion, garlic, rosemary, oregano—often I’ll go through the spice cupboard and take a spoonful of all kinds of stuff and put it in the pot. I love to put in a stick of kombu (dried kelp) at this point. http://en.wikipedia.org/wiki/Kombu
Keep an eye on the water level to make sure the pot doesn’t boil down to nothing and burn during the next 3 days. Yes—3 days, 72 hours. You can add water as needed, but I think the result is better to just to keep the simmer low and the lid tight. I have a gas range which doesn’t like to simmer, so I end up putting a skillet under the pot to help prevent the broth from boiling too hard. You can see it in the photo.
On occasion, I’ll get marrow bones that aren’t cut in half by the butcher. These in the picture goat shank bones, and I broke them in half after nicking them with a hack saw. This lets the marrow add to the broth.
By the end of the 3 days, the bones will be much softer—if you remembered the vinegar you will be able to crush them with your fingers, and the broth will be thick & rich. Strain out everything and let the broth cool. If there is too much grease on the top, it can be removed easily after it’s chilled in the refrigerator. I save the extra grease for tallow candles—which will be a future posting.
My kids and I all love the Yorkshire pudding from the marrow bones, and we will spoon it out while it’s still hot in the strainer. On the very rare occasions where there is more than we want to eat, I just add it back to the broth. The bones go into the wood stove so they will crumble quickly & easily when the ashes are spread on the pasture to return the much needed phosphorus and trace minerals back to the soil.
All poultry bones return to the stock pot after the come off of our dinner plates—yes, even after those roasted chicken drum-sticks been chewed on by the kids. Nothing goes to waste when it comes to our valuable pastured poultry! I add the extra chicken or duck or goose feet from our stash in the freezer to the pot on those days as well. These were kept in the freezer since summer’s butchering days to add to winter & spring’s soups.
Enjoy!

