Archive for April, 2010

Delicious Kombucha

Posted in Fluoride info, Food & good eating on April 28th, 2010 by Nathan – Be the first to comment

Gunther Frank writes in his Kombucha book that the containers shouldn’t be washed between batches.

All of us love this stuff. 

It’s full of B-complex vitamin, is slightly fizzy, and has a refreshing bite to it when it is done well.  It usually goes pretty fast, so I make about 2 gallons at a time.  There are several recipes out there, but the basic one uses black tea and white sugar.  Here is what I do:

1 gallon of water
6 teabags of black tea (organic)
1 cup sugar (organic)
12 minutes

Bring the water to a boil and remove from heat.  Add the teabags, and cover the pot.  Steep for 12 minutes, and then remove the tea.  Add the sugar and stir—it will dissolve quickly.  Let it cool to below 100°F/38°C and add it to your fermenting container.

The kombucha “mushroom” or SCOBY (Symbiotic Culture Of Bacteria and Yeast) needs fresh air, so your container should have as much width at the depth of the liquid.  Since I use 1 gallon glass jars, it means that I only fill them half full.  The SCOBY can get pretty thick, and there’s also a cup or two of ripe kombucha in with it when I start.  That means it takes me 5 jars to ferment my 2 gallons of sweet tea.  I use cloth around the tops of the jars, held in place by rubber bands. 

Depending on how strong you like it, it takes 7-10 days until the kombucha is ready to drink, so I use a strip of masking tape on the jars to show when the batch was made, and when it should be ready to serve.

When time allows, I like to bottle it up after day 4.  It takes another week or more to finish that way because the bottle seals off the oxygen.  The result though is a refreshing carbonated drink that can travel easily without spilling.  Grolsch beer bottles work great for this–I picked several cases of used bottles after a couple weeks of watching www.craigslist.com

Same jar, 7 days later

A note about fluoride and tea:

The tea plant naturally concentrates fluoride from its environment. 

“Tea is very high in fluoride because tea leaves accumulate more fluoride (from pollution of soil and air) than any other edible plant.”  http://www.westonaprice.org/Fluoride-Worse-than-We-Thought.html

I strongly recommend using an organic source of black tea because fluoride is a component of many agricultural pesticides.  It gets sprayed on the plant, and then the tea plant extracts any overspray out of the soil and concentrates it into the leaves that you use.

Many parts of the country have fluoridated city water, so you might get to deal with the “double whammy” of steeping fluoride out of the teabag into the fluoridated tap water.  Our current solution is a quality de-ionizing water filter and organic black tea.

Grass fed candles

Posted in Home products on April 24th, 2010 by Nathan – Be the first to comment

Friday’s experiment with tallow candles was the most successful yet! 

Candles with 1 part beeswax and 2 parts tallow


On my previous experiments, I’ve been pleased to learn that the tallow does not smoke, and it has almost no odor.  The problem I was running into though was that pure tallow has a very low melting point, and so the candles are soft, fragile, and the grease drips away from the flame much faster than it burns. 

I used stearic acid before to try to harden the candles up, and it did help.  The problem I had was that the final candle needed to be about 20% stearic acid and 80% tallow to get a decent wax out of it.  Stearic acid is extracted from palm kernel, and I’m happy to use it, but I don’t happen to have any palm trees growing on my place.  For the expense of it, I might as well buy candles instead of making them. 

Which made me think of my beehives.  I have my own (limited) supply of wax now, and mixing tallow with it seemed like a good way to harden the grease and stretch my beeswax into enough candles to matter.  So yesterday I gave it a try, and made a small pot of wax out of 2 parts tallow and 1 part beeswax. 

The result was beautifully successful!  My process was a bit rushed, and the two candles I did came out lumpy and crooked, but burned wonderfully.  The result was strong enough to treat as normal candles, and they didn’t drip.  The flame was bright–not too tall and not too dim, with only a very small amount of “bloom” forming on the end of the wick after almost 2 hours of burning. 

I’ll do a larger production later this spring and see if I can keep up with this home’s need of about 4 candles/month. 

I love it when things work out! 

read more »

Honeybee journal entry

Posted in Beekeeping, Farming, Top Bar Hives on April 23rd, 2010 by Nathan – Be the first to comment

Here is what I found in today’s inspection:

Tango hive:  (new top bar hive)

Humid inside!  I need to drill some ventilation holes in the bottom, and maybe another entrance hole.  There is comb drawn on 7 bars, 5 of which are completely drawn.  Some capped honey is on the end, but otherwise it’s relatively light on nectar–the bees have been using it to generate wax.  This is fine now, but it means that I’ll need to feed them through the bloom dearth that hits in late May.  Capped brood is visible, with a lot of eggs.  The queen has been busy.  I did see her but I had not set out to find her.

I removed the empty syrup can which came with the package.

Oscar hive:  (observation hive)

The frame behind the window has not been maintained by the nurse bees.  A few come up to feed the brood, but not enough.  Many of the cells have larva that are dry.  Many eggs did not hatch because they got chilled for lack of nurse bees and were removed 4 days after the frames were put in.  A host of drones had been stuck last week behind the queen excluder between the top window and the bottom 5 frame nuc box.  I released them, and the kids caught many of them as pets.  They are now inside the house in various tube & cardboard cages.

At least 7 capped queen cells were in the bottom 5 frames.  Hooray!  I moved one frame up to the top position, so I can see when she hatches out.

24 hour mite drop on Wednesday evening, 4/21 was 18 mites.  Contact paper was not sticky enough to hold the mites, so the next day I used a plastic board coated with coconut oil, which seems to work better.  A 30 window yielded 13 mites Friday morning, 4/23.

It was a little tricky getting the access tube re-attached to the hive when I finished because it was full of workers trying to get back “home”.  No major problems, and only 3 bees were released inside the house.  They were promptly squished.

Alpha hive:  (The original queen & half the frames that I split from)

The bees have pulled comb and completely filled two of the empty frames I put in last Friday.  Worker brood, drone brood, eggs, capped honey, nectar & pollen are there in abundance.  I have them in 2 western boxes now, but they have not yet moved down into the bottom box.  All looks great here.

Bravo hive:  (one of the new nucleus hives; 5 frames of a western box with a separate entrance)

Well populated with young bees, and even many foragers coming and going.  It is adjacent to the original alpha hive, and has benefited from “drift” from the returning foraging worker bees.  3-6 queen cells visible, some open and some capped.  One was broken open because it was attached to adjacent frames–I’m glad there were spares!  This also looks very good with stores of honey, nectar, pollen.  There are a lot of capped drone brood.

Charlie hive: (the 2nd of the new nucleus hives)

Same as bravo hive above, except I didn’t inspect the last two frames which I could see had been waxed together by the bees.  There were a couple of queen cells in frame #3, and I expect there are several others in the last two frames.  I didn’t want to risk breaking them.  All looks great on this one too.

Notes:

Overcast but fairly warm ~60F.  Inspection done at 12:30 PM.

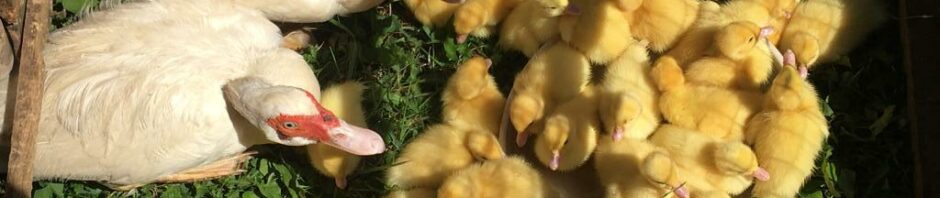
Chicken tractors for ducks

Posted in Chickens, Ducks, Farming, Pastured Poultry on April 21st, 2010 by Nathan – Be the first to comment
We’ve been raising ducks, geese & chickens since 2005.

Our current design for portable pens has been very successful with ducks & chickens, so I am posting the materials list & designs here so you can try it yourself.   

Because these portable pens are designed these for ducks, there are no laying boxes.  I’ve added one to the pen that has our chickens in it, but I’ve only included a photo of it in the instructions.  Contact me if you would like to get more detail than can be seen in the picture.   

Samuel and his ducks

One of the main criteria for these pens was to keep them light enough so my 8-year old boy could move them on his own.  I think the 5×10 ft size is a good compromise for capacity & weight.  They have worked very well for us.  Generally each pen holds a total of 8 adult ducks for eggs.   During the summer, we kept about 15 meat birds in the same space and you could go with a higher density than that if you are willing to move them twice a day.  The ducks generate a lot of mud during the winter rainy season here in western Washington, so we’ve kept the population down to ease the burden on the grass.  

If you do give it a try, please let me know what you think of them, and how they might be improved.  

DuckPenConstructionInstruction.pdf  

DuckPenMaterialsList.pdf 

Goslings spotted today!

Posted in Farming, Geese, Pastured Poultry on April 21st, 2010 by Nathan – Be the first to comment

My morning routine is pretty well established, which is important because it takes me about an hour before I’m awake enough for independent thought.  My wife will agree that stumbling around in the morning without having your “brain turned on” is a guy thing.

 Anyway, this morning I was stumbling through the routine of feeding the geese, and encouraging the ganders to hiss at me. 

“Good morning Duke, thanks for coming over!  I’m glad to hear that you don’t like me coming by because it means you’re being a good guard-gander for the goose who’s sitting in the pen behind you.”

I had finished throwing the lettuce & celery into the last pen and had turned to walk away when I stopped with a big smile.  Three bright, neon-green goslings had climbed on top of their mom who was still sitting on the nest (day old goslings always have a tinge of neon-green).  It takes 31 days for goose eggs to hatch, and there they were.

 The best part for me was the fact that I didn’t have to worry about keeping these little ones warm today, even though it was pouring down rain & only about 45°F.

Success!

What a joyful morning!

Splitting the beehive

Posted in Beekeeping on April 16th, 2010 by Nathan – Be the first to comment

My goal has been to keep about 6 beehives.  Last year I started with 2, ended with 1, and learned a ton about beekeeping.  That one hive is doing great, and there’s still about 3-4 weeks left on the major spring “bloom”, so it’s a good time to split the hive before it swarms.  The queen will stay in her original home, the “Alpha hive”.

I moved 6 frames into my ulster observation hive, which is a regular 5 frame deep nuc box with a special 6th frame top behind glass. I’m calling this new hive my “Oscar hive”.  It comes into the house, but the bees can access the outside through a tube connected to the window.  Officially it’s a homeschool project, but I’ll enjoy watching it as much as the kids will!

These bees walk through the tube to get outside the window.

Last year I got a hive box that is split in half, with 5 frames on one side and 5 frames on the other, with a divider board between them.  Each side has it’s own entrance and top feeder.  I moved 8 full frames and 2 empty frames into this box, equally split between the two sides.  These two new hives I’m calling “Bravo” & “Charlie”.

My top bar hive has now been dubbed the “Tango hive”.

Each of the new hives get frames containing a mix of capped brood, larva, unhatched eggs, nurse bees, and honey.  I reoriented the old hive so the entrance faces a new direction, and put the split hive box adjacent to it so returning foraging worker bees will have to decide which hive was theirs, with a portion “drifting” into the new hives.

Each half of this box is a small "nucleus hive".

Each of these new hives should rear a new queen from their young brood or unhatched worker eggs.  It takes 28 days for a new queen to grow from a fertilized egg to a mated & laying queen, and I’ll enjoy watching the progress along the way.

Hopefully this will all go well.

Exploding population in the beehive

Posted in Beekeeping, Farming on April 14th, 2010 by Nathan – Be the first to comment

Here is a new queen cup on a brood frame

There are new opportunities every day.

Yesterday afternoon, I inspected my beehive.  The maple trees have been in full bloom for the past few weeks, and the bees have definitely made the most of it.  Their population has more than doubled since the bloom began there’s a lot of fresh wax and it’s loaded with nectar, pollen, & brood.  The hive looks great! 

The bees also think it looks great because I discovered they had built several swarm cells on the frames.  This means the queen and half of the bees are getting ready to leave home.  I have wanted to increase my hives, so now I’ve got the chance to do it.  If I do nothing, then the old queen and about half of the worker bees will swarm away in search of a new home shortly before the new queen hatches out.  However, I’d rather not lose half of my bees if I can avoid it.  Many beekeepers cut out these swarm cells when they find them, but I’m taking it as an opportunity to split them into another hive.  

There were no eggs or larva in the cells yet—they weren’t there when I opened the hive last week.  I can expect a new queen to emerge 16 days after an egg is laid in them.  The old queen should stay in the hive until the new queen cell is sealed up during its pupa stage—8 days after the egg is laid.  That means I’ve got a week from today to split this hive in two.

Addendum:  I’ve since learned that it is normal to have empty queen cups in the hive, and that the queen will not lay in it until it is needed.

Installing Packaged Bees into a Top Bar Hive

Posted in Beekeeping, Farming, Top Bar Hives on April 13th, 2010 by Nathan – Be the first to comment

Packages of worker bees w/a queen; One of these is mine

The queens came in individual cages, and ran $20 each if you just wanted to re-queen your hive. The whole family was along with me when we got them, and we all got to see how they were delivered.

The queen that I bought was in a tiny wooden box like this, only it was hanging inside the box of worker bees.

Nurse bees tend the cages of single queens waiting for a hive

Nurse bees tend the cages of single queens waiting for a hive

I ordered a new package of honey bees this year through the Puget Sound Beekeepers Association.  For $75, I got 3 lbs of bees (about 12,000 insects, but I didn’t count) along with a queen.  I picked up my new bees on noon Sunday, which turned out to be a nice spring day. 
 
After we got home, ate lunch, and had our usual afternoon Siesta, they were ready to go into their new home.  I put the finishing touches on our new top bar hive (http://www.biobees.com/), and moved it out to a good sunny spot in our back pasture.  Although I had aspirations to build one out of recycled pallets, I was pressed for time, and used the scrap plywood instead.  (that still counts as recycled wood in my book)  The biggest change to the construction plans was the addition of a viewing window to make it easy to follow what happens inside.  

New top bar hive ready for bees

This hive is 15” wide at the top (inside dimension), 6” at the bottom, and 48” long.  There are 34 bars are 17-½” long and 1-3/8” wide, one of which has a divider attached so I can adjust how much space the bees have.  This is my first top bar hive, and I do not have bars with drawn comb.  That means there is a risk that the bees may choose to draw comb in the wrong direction.  To help them choose wisely, I’ve notched the bars so there is a bit of wood hanging down about 1/8” for the bees to hang onto.  

These top bars have a bump so the bees hang straight comb

Installation was pretty simple.  I just opened the box and dumped the bees in.  Because packaged bees don’t have a hive to defend they are quite gentle.  I’m wearing gloves in this picture because it keeps me relaxed when working with the bees, and a calm beekeeper makes for more docile bees. 

The queen cage is in my pocket

I gave the bees 12 top bars of space to get started.  As they increase, I will move the follower down the hive and give them more bars to hang comb on.  Until they have enough stores built up, they need supplemental feed too.  The can of syrup that came with the package is sitting inside the hive on a couple of short sticks as a feeder.  I will remove it in a day or two and feed dry sugar after the syrup is gone.  

A towel keeps the queen from flying away when I open her cage

These bees have spent the last 3 days in a box together with their new queen, so they will accept her without more delay.  That means that I was able to do a “direct release” of the queen into the mass of worker bees.  She could still fly away if she wanted to, so I draped a towel over me to prevent her from escaping.  Once that job was done, the last of the top bars went back in place, the roof went over them, and I left them to their new home.

150 lbs. of romaine lettuce

Posted in Farming on April 9th, 2010 by Nathan – Be the first to comment

Our neighborhood has the best produce market in the county.

Discarded greens from the local produce market

Yesterday afternoon I made my usual stop at TopOfTheHillQualityProduce to pick up their discarded greens.  I’ve been doing this every day for almost 2 years now, and have built a great relationship with them.  Now that spring is coming in, business is picking up and that means they generate more “garbage”.  As I pulled into the parking lot, Francisco pulled out two 32 gallon buckets full of the usual debris of lettuce, spinach, cabbage & celery, and then pointed to a bonus of 5 cases of romaine lettuce.  Woohoo!  The tops had started to wilt so it no longer met the store’s quality threshold of perfection, so out it went.

I loaded it all into my car, left off the 2 empty Brute trash cans from the previous trip and hauled it all home.  After a couple minutes of sorting out the bits of plastic & rubber bands, it was ready to go out to the geese & ducks.  They love tearing into the heads of lettuce, and it does my heart good to see free food supporting the birds and the manure enriching the soil around the farm. 

Turnips, carrots & root crops don’t help waterfowl much, so that gets directed to the goats.  None of the animals have shown an interest in eggplant, asparagus or cabbage, so that gets hauled out to help expand my red wriggler worm farm & vermiculture system.  Diversity is a wonderful thing!

How to stack a woodpile

Posted in Home products on April 8th, 2010 by Nathan – Be the first to comment
A nice stack of firewood

“Nathan, you make a good looking woodpile.”

You’ve got to smile when your mother-in-law compliments your collection of firewood.  It happens that mine actually splits and stacks her own firewood, and knows what she’s talking about.

Over the past several years I’ve had about a dozen different people help out with moving, hauling and stacking firewood with me.  I love having willing volunteers, and it’s been great to have the help—especially with tasks that take more muscle than brain.  What has surprised me though, is only 1 of my helpers has known how to stack a proper woodpile. 

Often the pile starts out in the gap between two conveniently located trees, and is soon followed with a question like:  “What should we do now–there isn’t any space left to put away the rest of the wood?”  Or maybe the opportunity would show up as the helpers began a second row of wood which rapidly turned into a triangle with pieces rolling down the face of the new row.  Last December, I had a person ask me, “why are you putting the pieces on the end of the pile the wrong direction—does that help with the air-flow?”.  I’m always glad when these questions come up and I can to show how this keeps the logs from rolling off the end of the pile—it’s easiest to explain the pile is going up.

I’ve toyed with the idea of offering educational workshops on the farm–including a course on firewood stacking.  I could have a big load of wood dumped next to the house, and get everyone to do the work for me as I explained the details of making a stack that has square, vertical ends with a lovely, flush face and level top.  If there was time we could discuss the finer points of how the pieces used on the perpendicular ends must always be of split rounds of equal depth & height, and that there should be an ever so slight slope towards the center of the pile to prevent the wood from falling over the wrong way as it dries.  It would be important to have actual firewood to work with since wordy descriptions just don’t work as well.

For those ambitious learners we could even go into the science of splitting and “reading” wood for checks and knots.  There would be discussion sessions to compare effort & heating performance of Douglas fir vs. alder or maple.  The second course would pick up and go through the details of felling, limbing and cutting with axes, hand powered crosscut saws and 2-cycle chain saws. 

This would also tie together with what time of year is good for using the small branches & leaves for goat browse, as well as how mushrooms & fungus feeding on the stumps & roots of harvested trees enriches the soil for the new seedling trees. 

It would take at least a full afternoon to cover the many topics of woodlot management, and how coppiced trees produce firewood & poles so much more efficiently than wild timber stands.  It would be good if I had demonstration areas of pollard trees and living fence posts which facilitate animal grazing operations.  There would have to be an additional day to discuss species and site selections so people could decide whether to plant a colonizing, leguminous trees like red alder and black locust, or whether a climax species like western red cedar or Oregon maple would be most appropriate for their woodlots & pasture hedgerows.

The class applications could culminate with kindling fires in a cast iron wood stove to cook a meal, a masonry oven to bake the bread, and a Finnish-style masonry heater to warm the building for the day.

….

My, but how daydreams can roll on while doing a mindless task like stacking firewood….